Virtual charger
Create lab charge points that OCPPLab runs for you, deploy one or thousands, and inspect each charger from its own pages.
Virtual charger runs OCPP charge points for you inside OCPPLab. You create a lab charger in the Dashboard, OCPPLab starts an emulator for it, and the charger connects to your CSMS (Charging Station Management System) over OCPP. No hardware and no local simulator are involved.
Use Create a charger instead when you register a physical station you own.
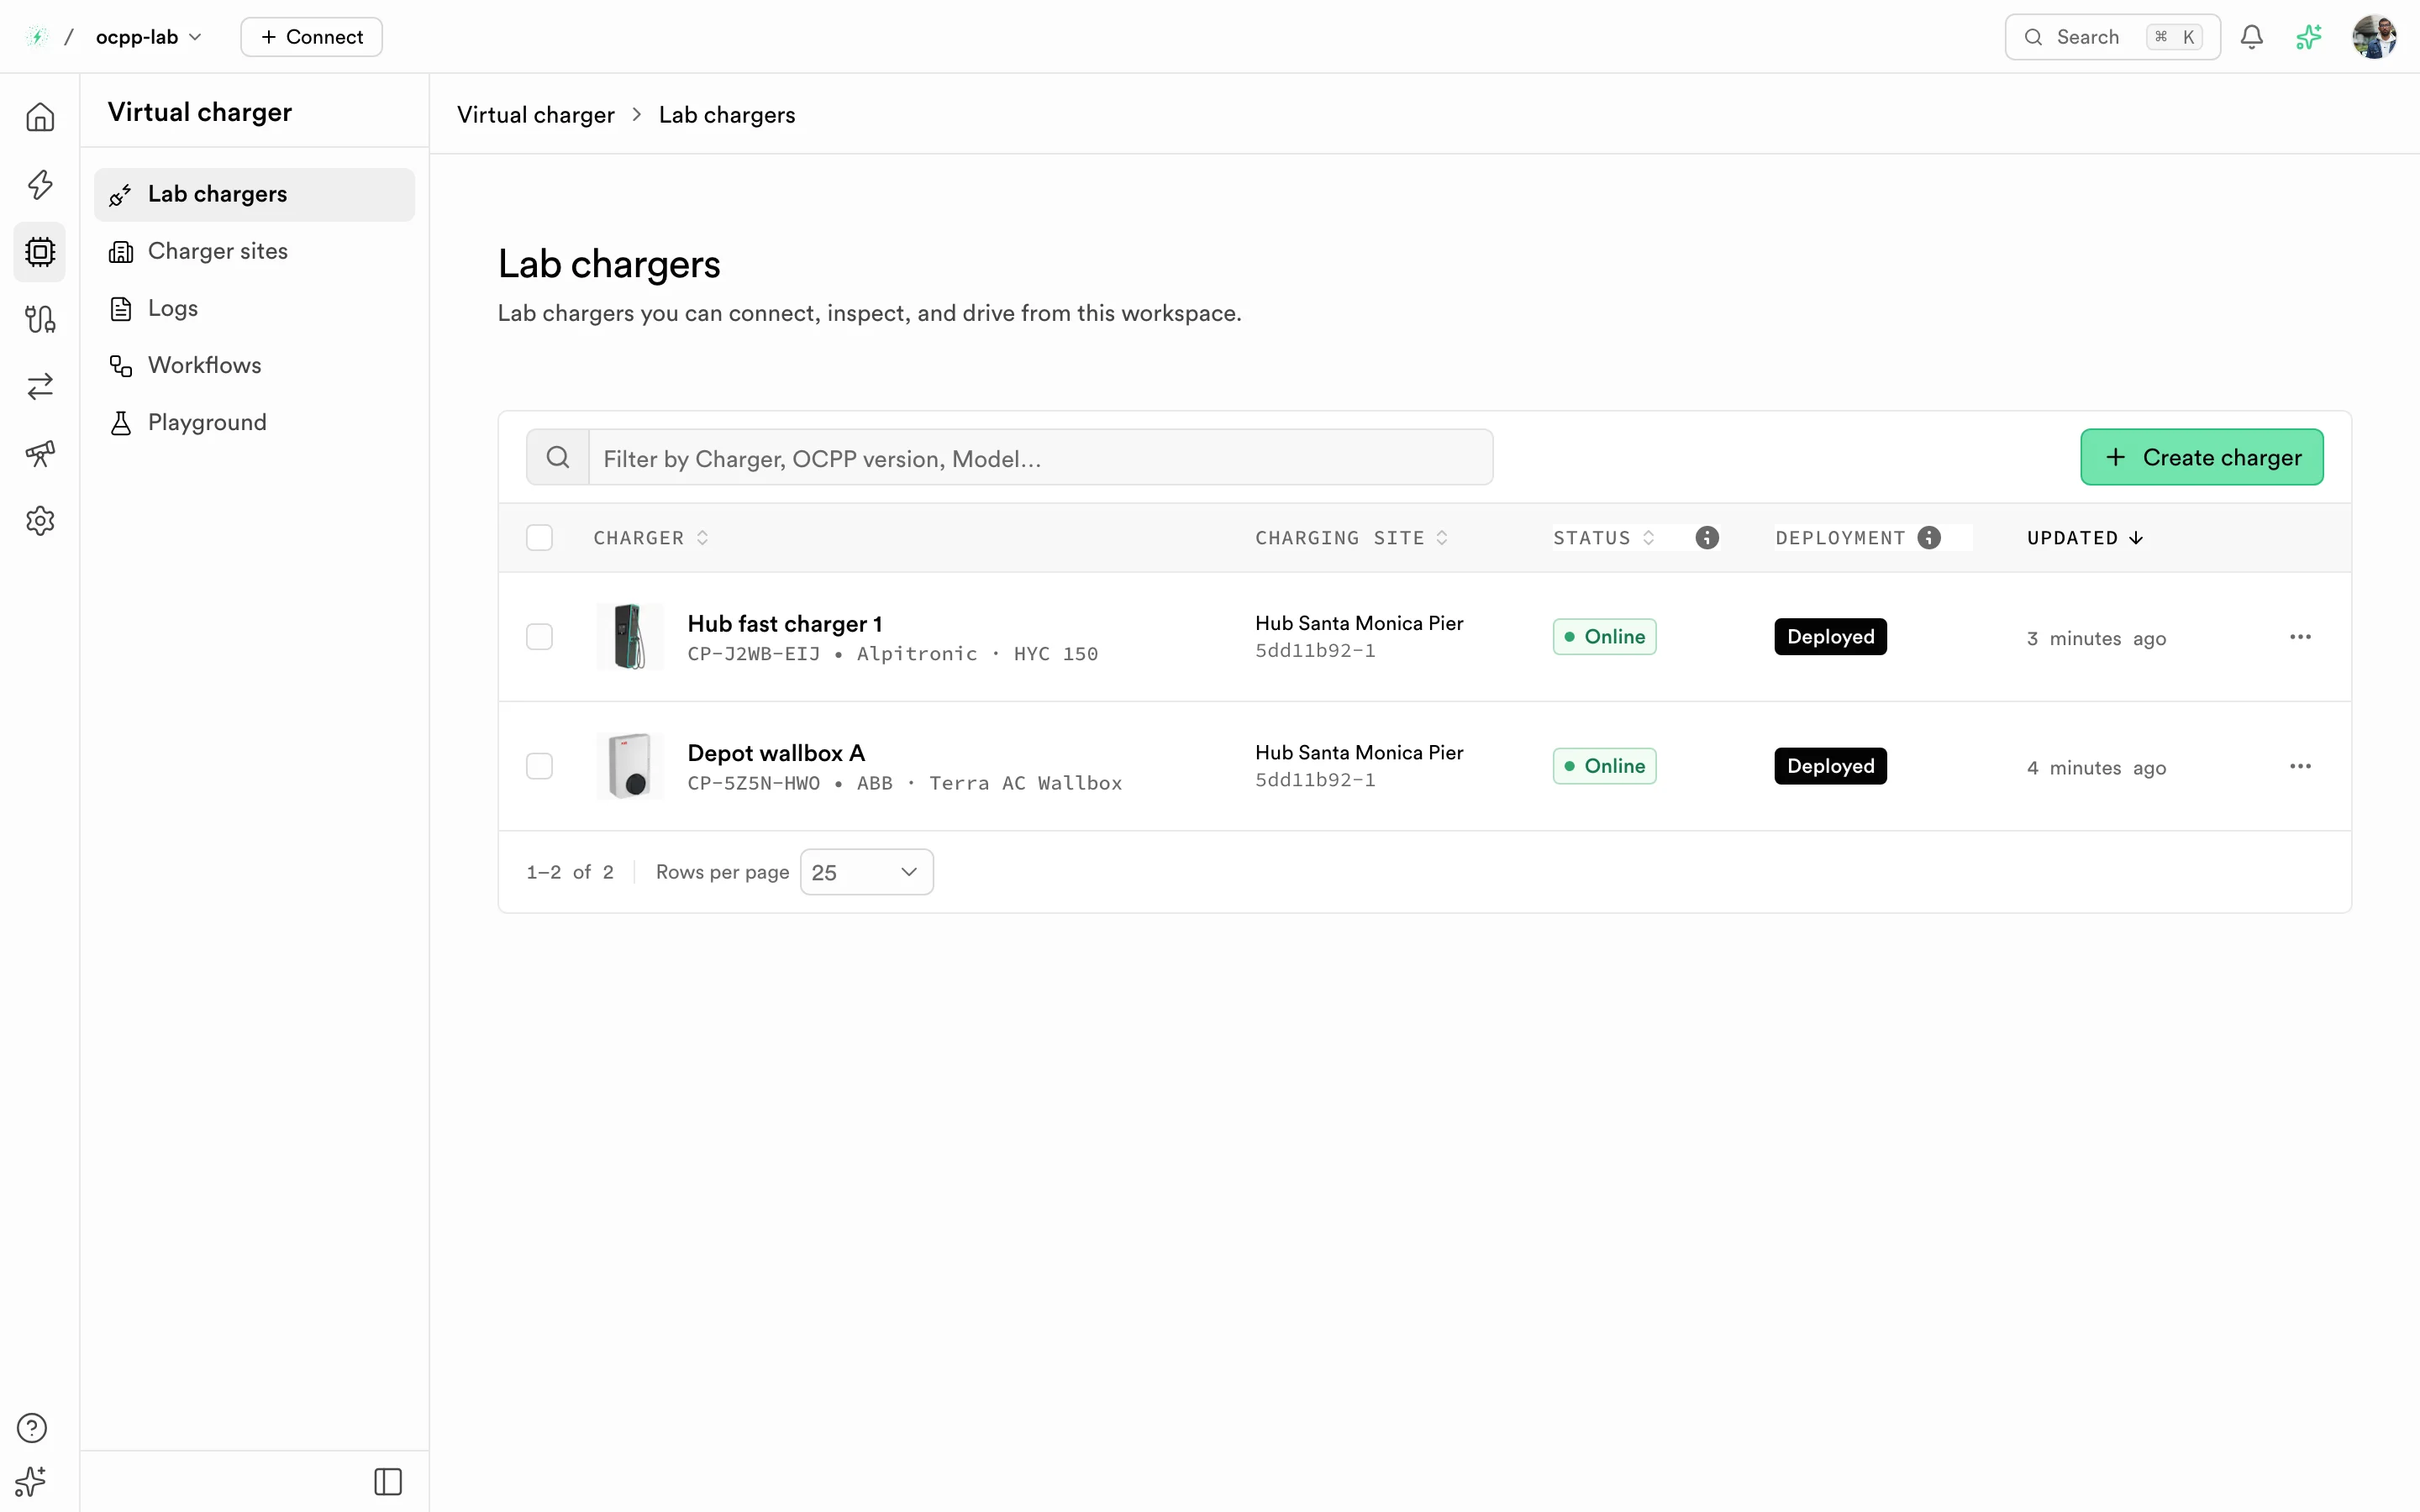
Lab chargers — each row shows the charger, its site, connection status, deployment state, and last update.
Before you start
- You are signed in to the Dashboard with permission to manage chargers.
- A charger site exists, or you create one first in Charger sites. Location is required.
- You know which OCPP version your CSMS expects.
Never paste live OCPP passwords, OCPI tokens, or client certificates into tickets, chat, or public issues. Rotate anything that may have been exposed and use Dashboard or your secret store for operational credentials.
Where it lives
Path: rail → Virtual charger. The area has five pages, and its logs live in the Logs area:
| Page | Route | Use it to |
|---|---|---|
| Lab chargers | /dashboard/virtual-charger | Create, open, and act on lab chargers |
| Charger sites | /dashboard/virtual-charger/sites | Group lab chargers by location |
| Workflows | /dashboard/virtual-charger/workflows | Run a sequence of OCPP calls and check each reply. See Virtual charger workflows |
| Playground | /dashboard/virtual-charger/playground | Send one OCPP call and see the CSMS reply. See Virtual charger playground |
| Test runs | /dashboard/virtual-charger/test-runs | Run saved workflows as a load or scenario test against your CSMS. See Test runs |
Create a lab charger
Path: Virtual charger → Lab chargers → Create charger.
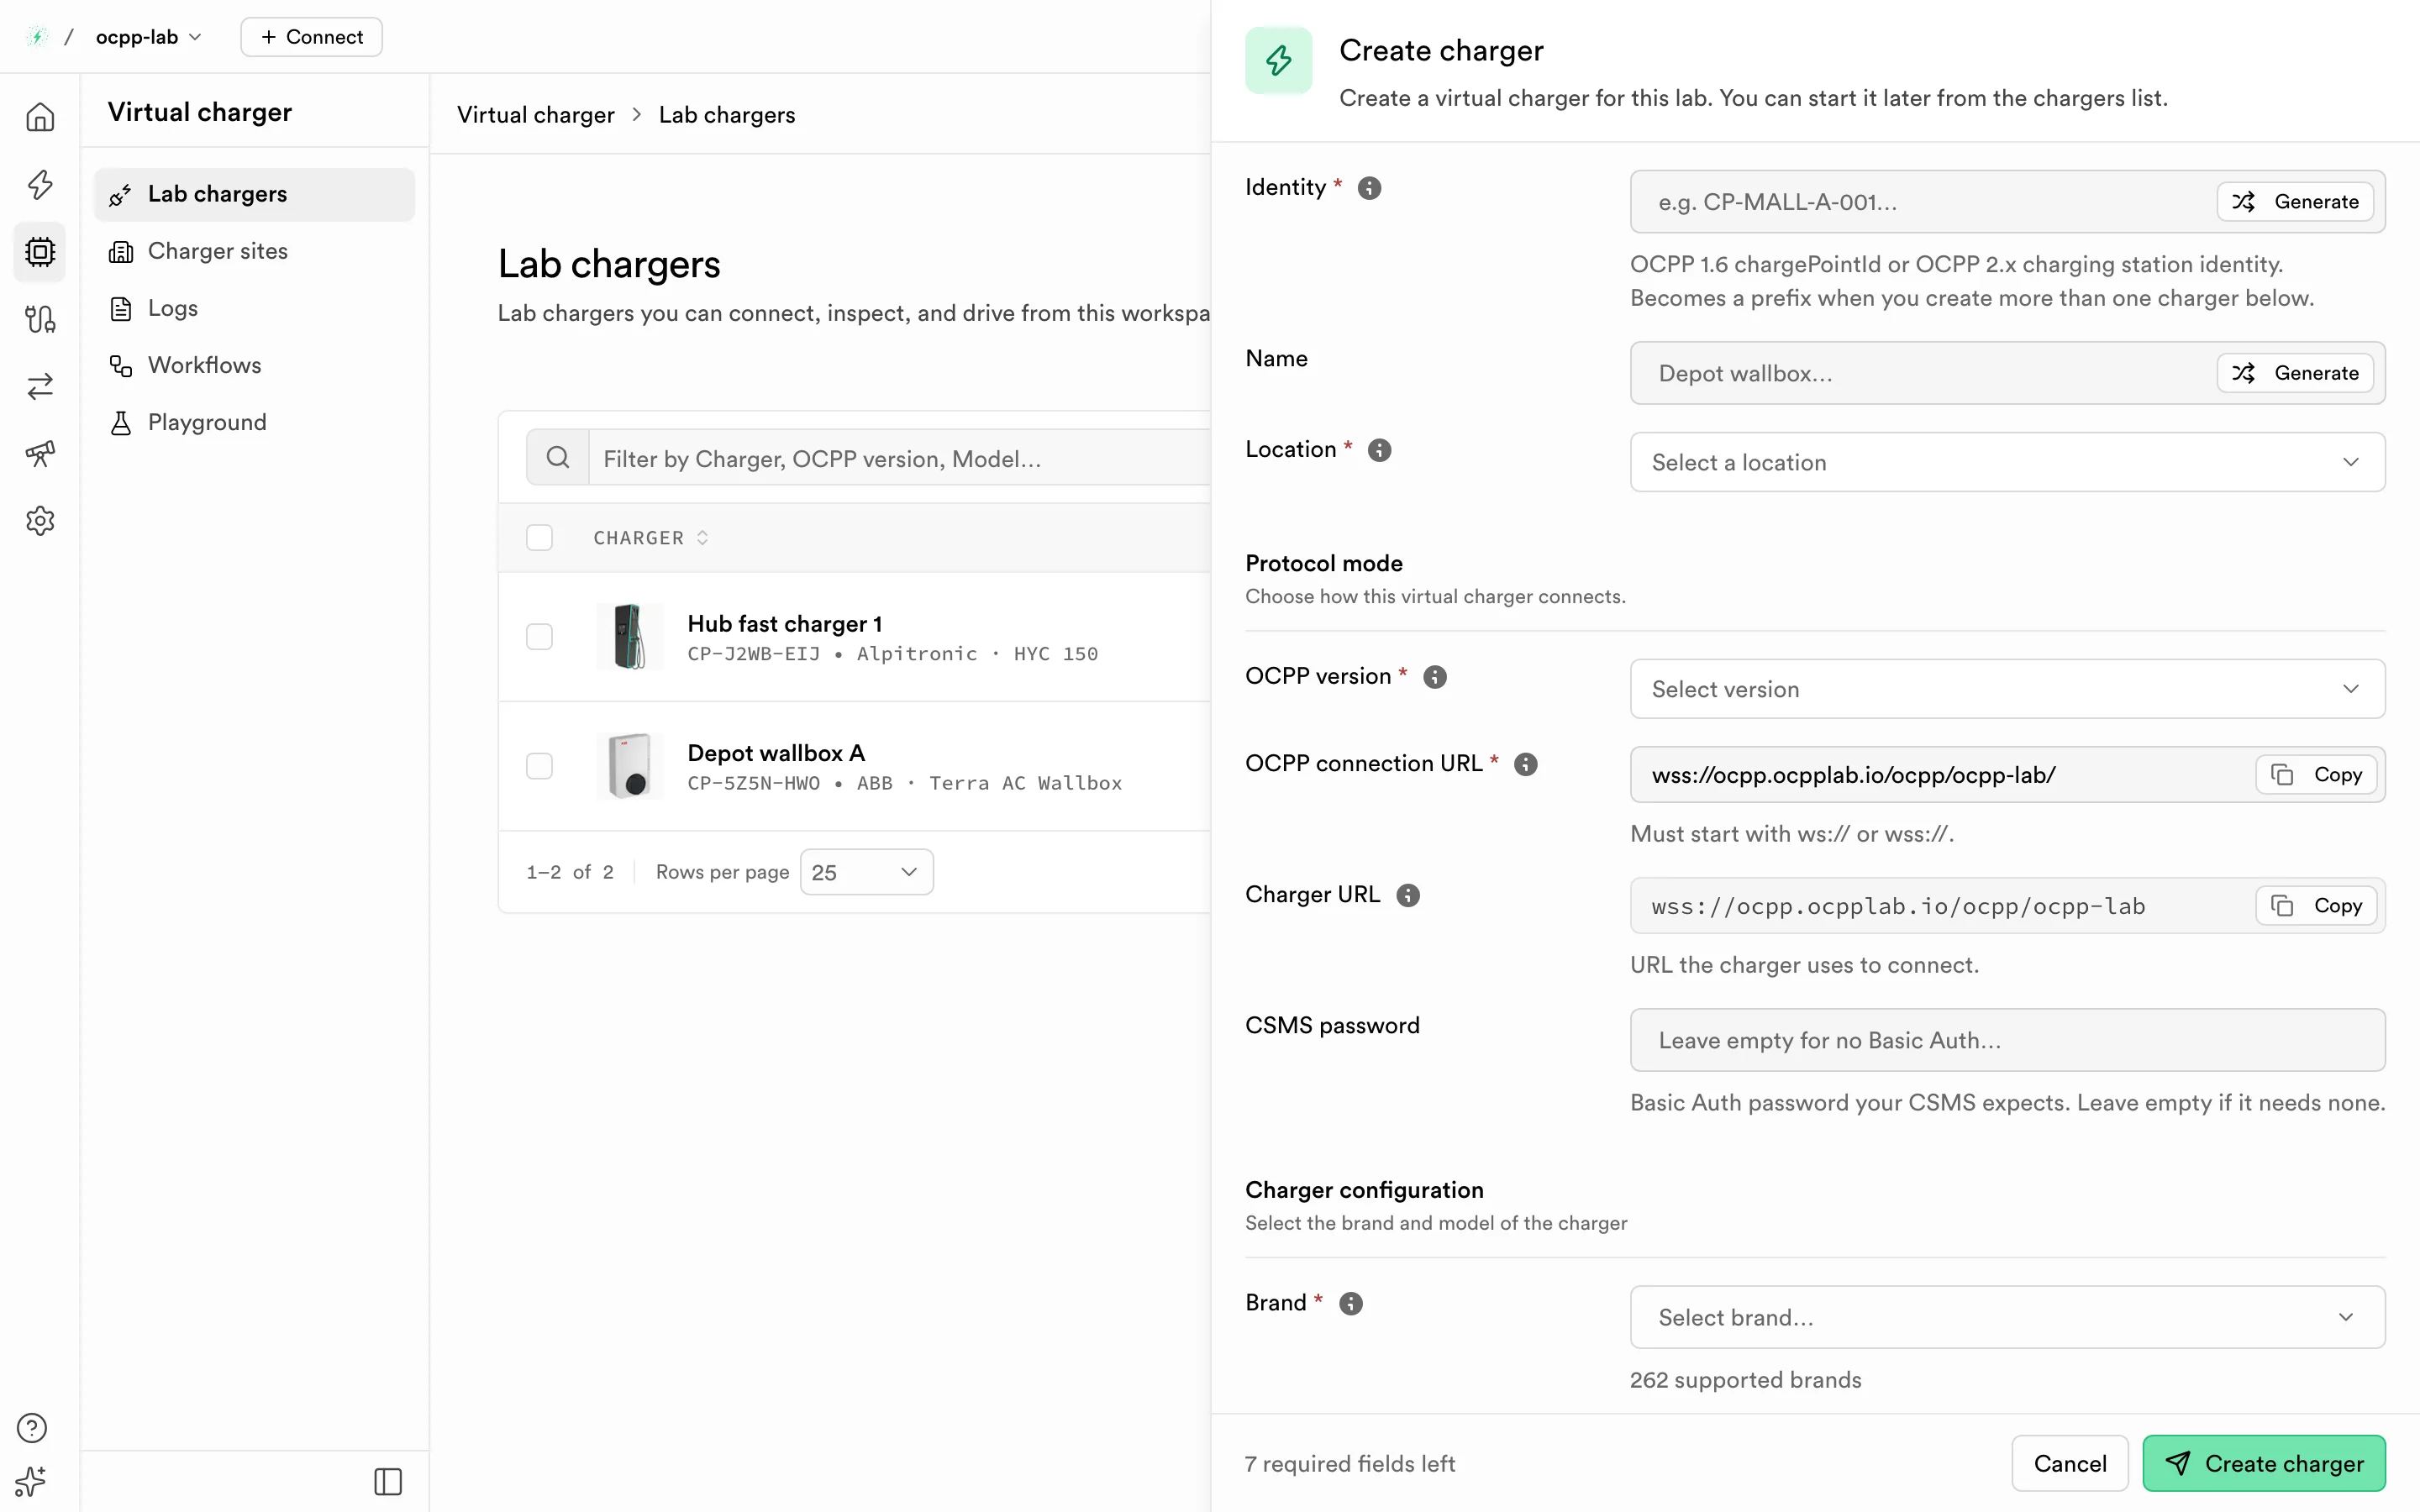
Create charger — identity, location, protocol, CSMS password, and catalog model in one sheet.
Required fields are marked with *. The footer counts the required fields still empty, including the connector fields lower in the sheet.
Charger identity
| Field | Required | What to enter |
|---|---|---|
| Identity | Yes | The charge point identity used on the WebSocket path and in BootNotification, for example CP-MALL-A-001. Select Generate for a CP-AB12-XY3 style value. It must be unique in your organization. |
| Name | No | A label for the list, for example Depot wallbox. Generate fills in the model name plus a short code. |
| Location | Yes | The charger site this charger belongs to. |
Protocol mode
| Field | Required | What it does |
|---|---|---|
| OCPP version | Yes | The protocol the charger speaks. The list offers OCPP 1.6, OCPP 2.0.1, and OCPP 2.1. |
| OCPP connection URL | Yes | The CSMS WebSocket base URL, pre-filled with your organization's OCPPLab endpoint. It must start with ws:// or wss://. Change it to point the charger at another CSMS. |
| Charger URL | Read-only | The connection URL plus the identity: the exact URL the charger dials. Use Copy to take it. |
| CSMS password | No | The Basic Auth password your CSMS expects. Leave it empty if your CSMS needs none. |
Charger configuration and connectors
| Field | Required | What it does |
|---|---|---|
| Brand | Yes | Manufacturer from the catalog. |
| Model | Yes | Model within that brand. It sets the connector count and the catalog photo. |
| Max charging power (kW) | Yes | Power per connector, for example 7.4, 11, 22, or 50. |
| Connector type | Yes | Plug type. Filled in for you when the model has only one plug type. |
Select Create charger. A progress panel follows the deployment: Queued → Waiting for capacity → Downloading charger software → Starting charger → Connecting to CSMS → Registering (BootNotification) → Online. A charger usually comes online in about a minute. You can close the panel; the deployment keeps running and failures show on the charger page.
A new charger starts as Never connected. The Dashboard only shows Online after the charger has authenticated and sent a heartbeat.
Create many chargers at once
Path: the same sheet → Number of chargers (last field).
Set any count from 1 to 50,000, or pick 1, 10, 100, 1,000, 10,000, or 50,000. Above one charger:
- Identity becomes an OCPP ID prefix. Chargers are named
PREFIX-01,PREFIX-02, and so on. The field previews the first and last identity. - Name is numbered per charger, for example
Depot wallbox 1. - Every charger uses the same model, connector settings, OCPP version, site, and connection URL.
Select Create N chargers. The sheet sends the chargers in batches, four requests at a time, and shows progress, Created / Failed / Queued counts, time left, the IDs that failed (with Copy IDs), and live deployment stages for the first 10 chargers.
- Pause and Resume hold the run between requests. Stop skips the chargers not sent yet.
- Run in background hides the panel while the run continues.
- Keep the browser tab open until the run finishes. Closing it stops the chargers not sent yet; chargers already created keep running.
- After three failed requests in a row the run stops and shows the last error. Fix the cause, then select Create remaining.
Each charger runs its own emulator, so a large count starts that many deployments.
Charger sites
Path: Virtual charger → Charger sites.
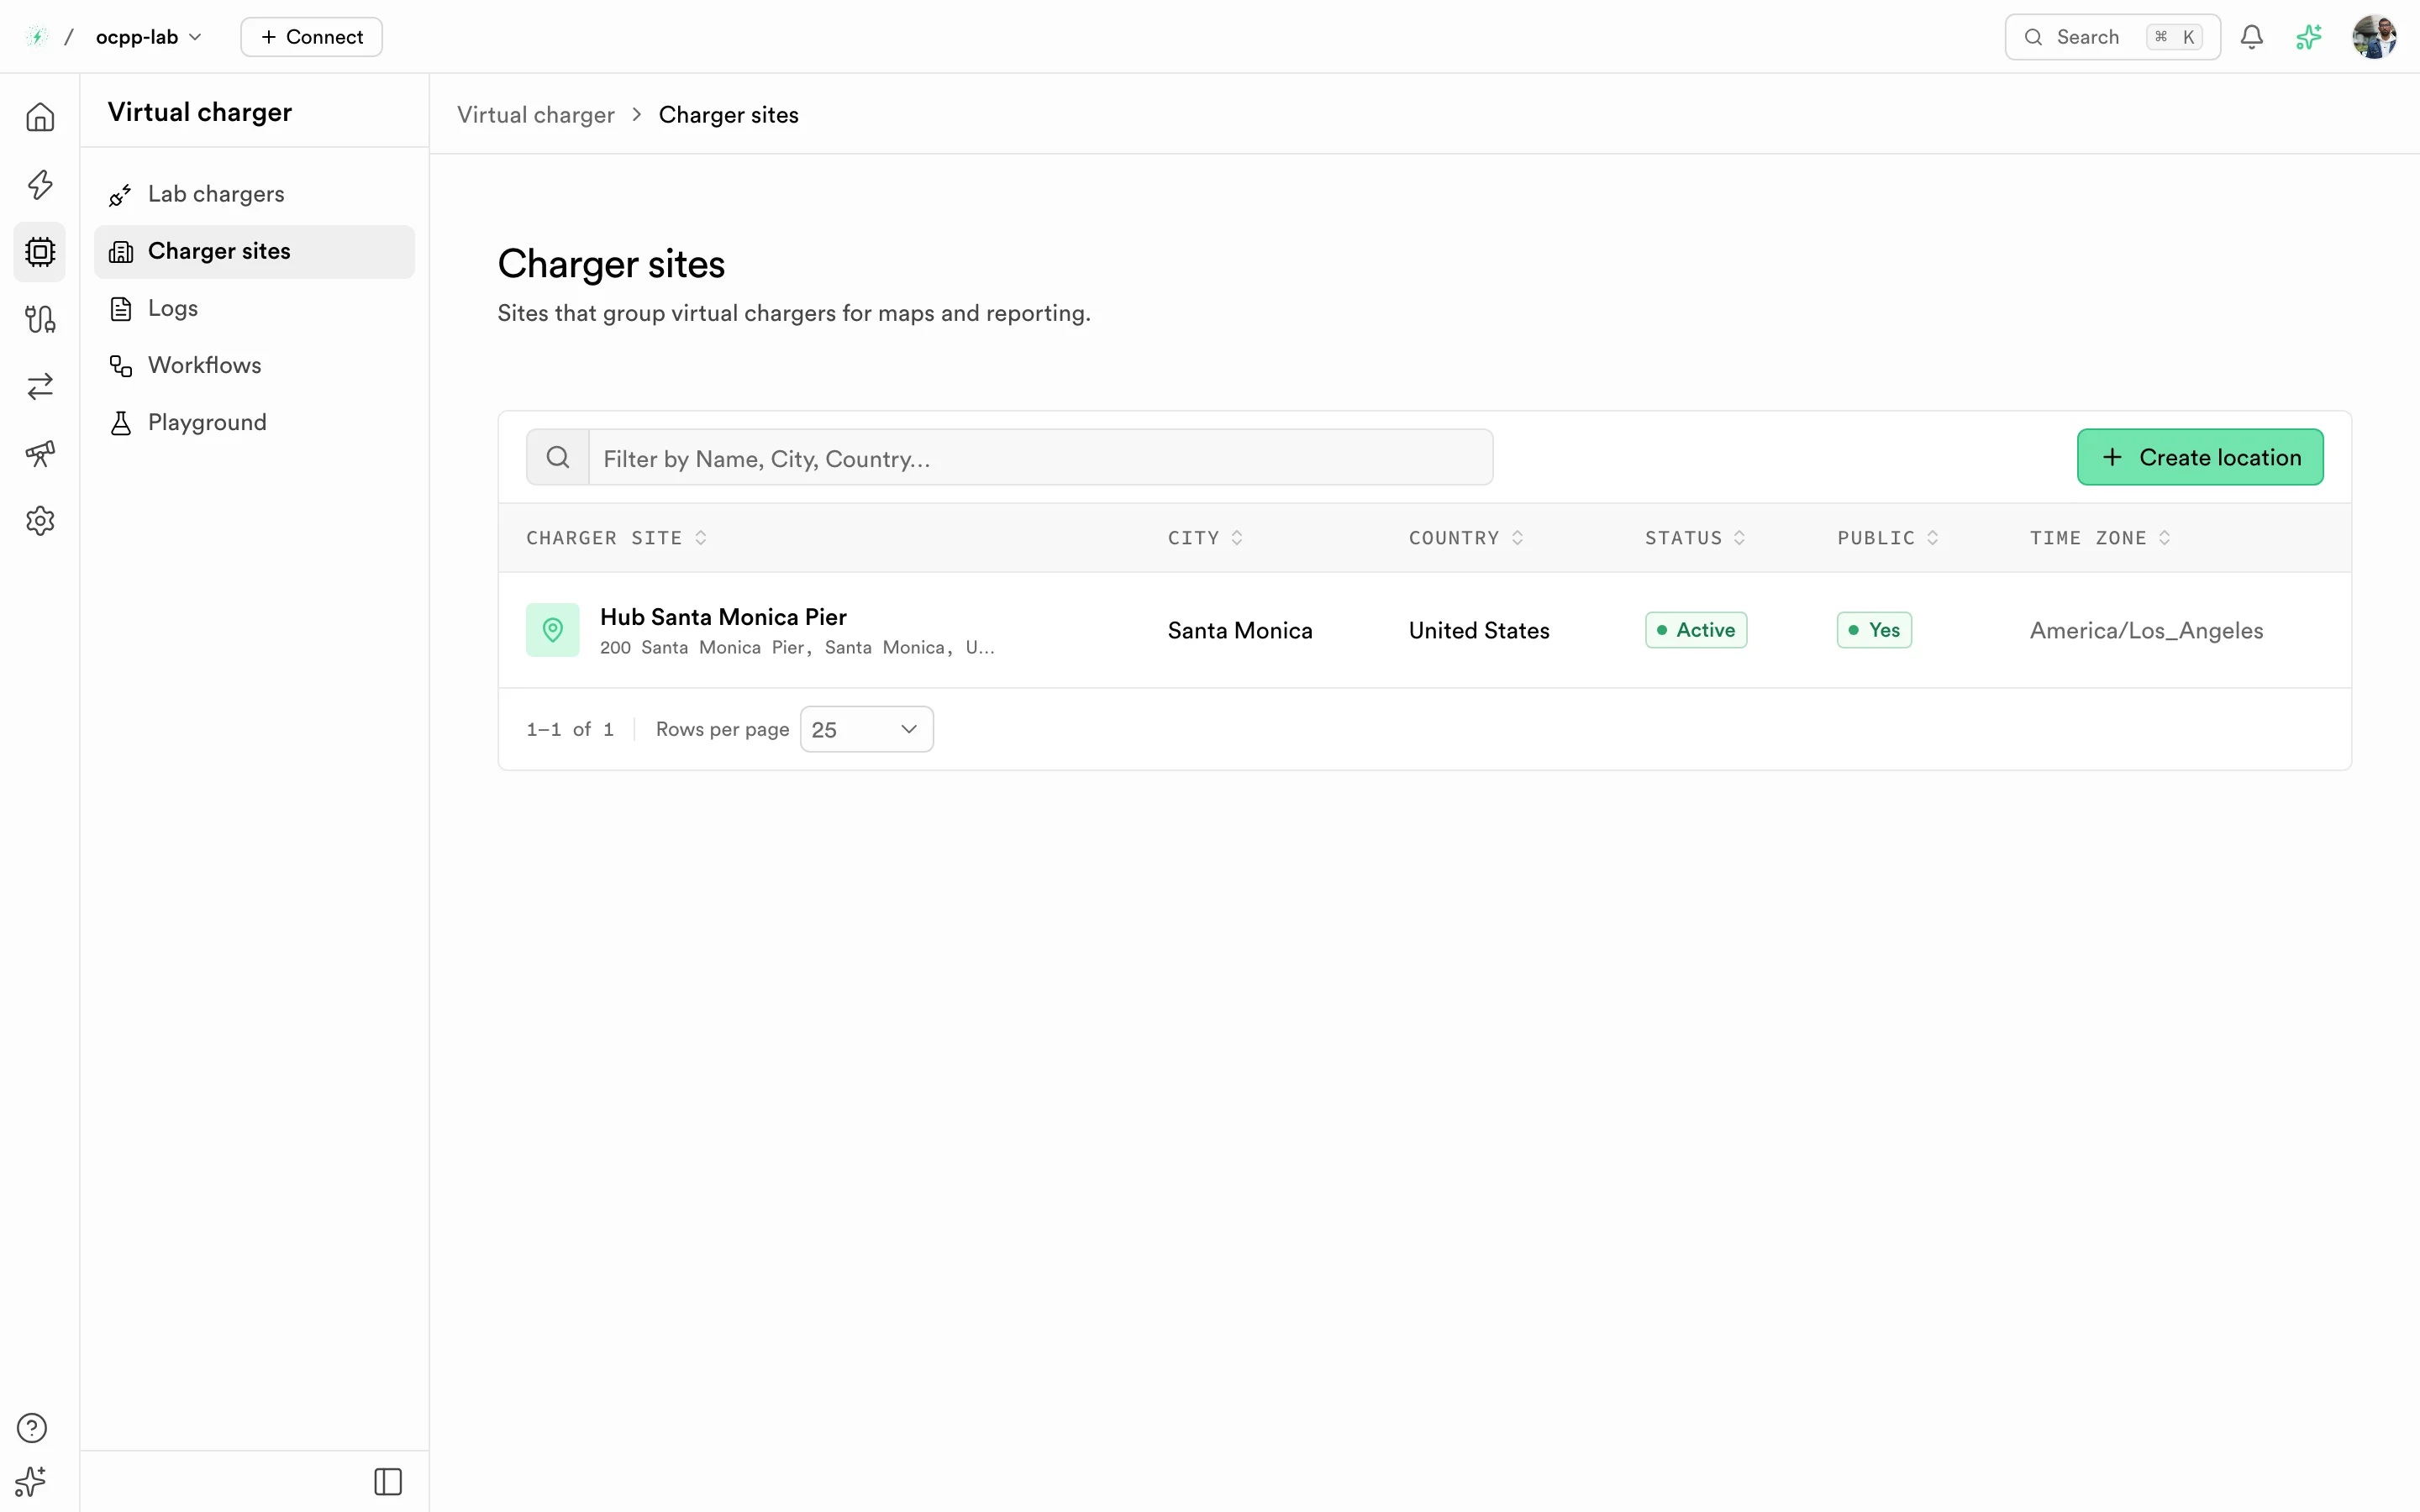
Charger sites — one row per site with city, country, status, public flag, and time zone.
Select Create location to add a site. Generate next to the site name fills a real sample address and coordinates. Every lab charger must belong to a site.
Inspect one charger
Open a charger from Lab chargers to reach its pages at /dashboard/virtual-charger/{identity}.
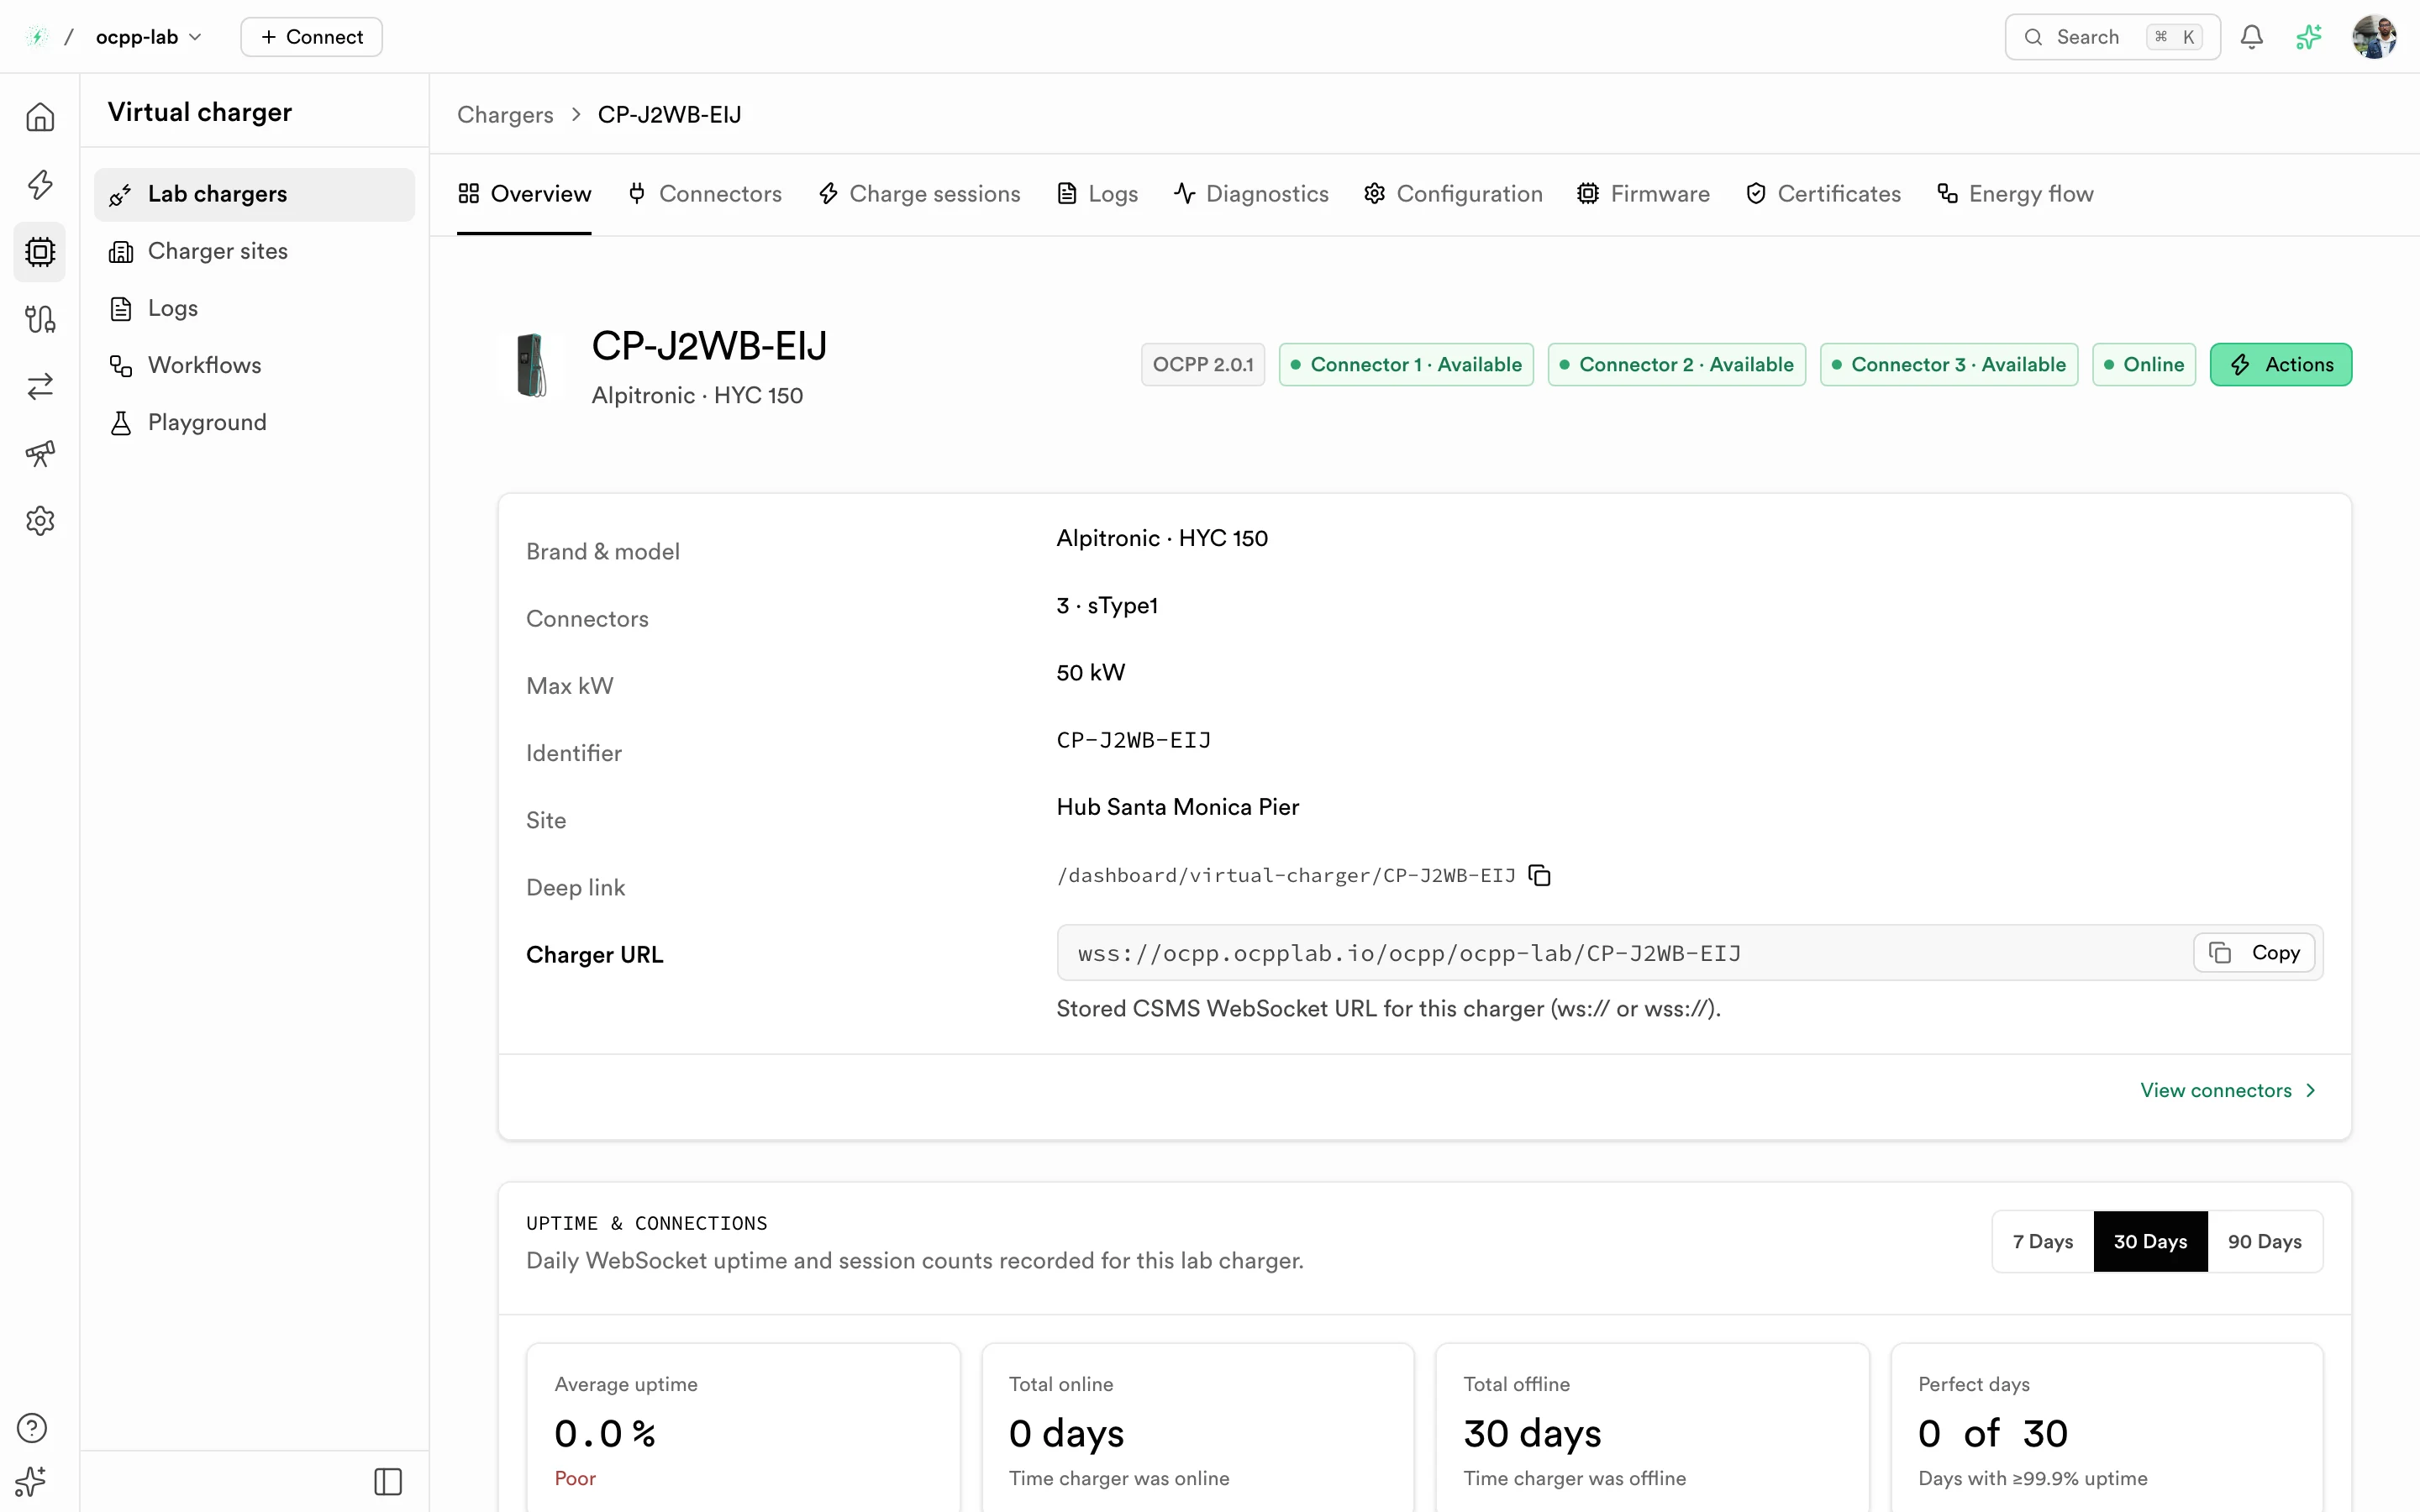
Charger overview — identity, OCPP version, connector status, online state, Charger URL, and uptime.
| Tab | What it shows |
|---|---|
| Overview | Brand and model, connectors, max power, identity, site, deep link, Charger URL, and daily uptime and connection counts. |
| Connectors | One row per connector with status and the Last command sent to it, plus the Live OCPP frames panel. |
| Charge sessions | Sessions this charger ran. |
| Logs | OCPP frames for this charger only. |
| Diagnostics | Diagnostic state reported by the charger. |
| Configuration | OCPP configuration keys. |
| Firmware | Firmware version. |
| Certificates | Certificate inventory for this charger. |
| Energy flow | Live power flow for the charger. |
Actions in the header opens charger-level commands.
Drive a connector
On Connectors, each row's actions send a lab command to that connector: Start session, Stop session, Plug cable, Unplug cable, and Authorize tag.
- Select Start session or Authorize tag. A dialog asks for the RFID tag and pre-fills the last tag you used for this charger.
- Pick a registered tag with Choose a registered tag, or type one. Your CSMS rejects tags it does not know: if the tag is not registered, the dialog offers Register tag to add it as Accepted in Authorizations.
- Confirm. A toast reports the outcome the charger records (Applied, Rejected, Expired, or Failed), and the row's Last command updates.
A command sent while the charger is offline waits until it reconnects. Watch Live OCPP frames on the same tab to see the exact frames exchanged with your CSMS.
Test runs
Test runs (/dashboard/virtual-charger/test-runs) runs your saved OCPP workflows as k6 tests in a sandbox. Each virtual user is one charger, and your CSMS is the system under test.
- Scenario runs up to 5 workflows once each, on 1 to 100 chargers at the same time.
- Load repeats one workflow across up to 100 chargers for 10 to 600 seconds.
Open a run to see each workflow's result, its checks, and the frames the first charger exchanged.
If you would rather drive it yourself
To send OCPP frames from your own script instead, follow Simulating a charger. It walks an OCPP 1.6 BootNotification → StartTransaction → StopTransaction exchange against a URL you copy from the Dashboard.
Related
| Goal | Guide |
|---|---|
| Send one OCPP call and read the reply | Virtual charger playground |
| Run a repeatable OCPP scenario | Virtual charger workflows |
| Read every frame the lab chargers sent | Virtual charger logs |
| Register a physical station | Create a charger |
| Understand the WebSocket URL | Connecting to your CPMS |